The Multiple Sclerosis (MS) Lesion Finder Tool
The MS Lesion Finder is a specialised version of the Fuzzy Connector. It
has been specially tailored to the task of finding abnormalities in the
(predominantly white matter) brain parenchyma. This is a task which is
widely performed as part of many clinical studies of MS. The tool
uses two template images that are built into Jim that
incorporate detailed knowledge of the likely distribution and size of MS
lesions in the head. The lesion prior probability template image has been
constructed from a large sample of MS patients' scans, and is used by the
MS Lesion Finder rather like a "fuzzy mask", to reduce the fuzzy affinity
to pixels where it is unlikely that MS lesions are found.
Using this tool should make the task of quantifying MS lesions
more reliable, less labour intensive and and less operator dependent.
You can, in principle, use the MS Lesion Finder to find lesions in any
type of MRI scans of the head, including proton-density-weighted,
T2-weighted, FLAIR and T1-weighted. However, the
tool has been validated using images from a double-echo sequence with
the following characteristics:
- Repetition time (TR): 2200-2800 ms.
- Echo times (TE): 15-50 ms and 80-120 ms.
- Slice thickness 3 mm.
- In-plane resolution ~1mm.
- Axial orientation.
First, set up the MS Lesion Finder tool as described in the introduction. If you an use an input set of images
with more than one type of contrast, each image contrast must be in a
separate image file. You may need to use the
Slice Extractor,
Image Concatenator, or
Image Interleaver to achieve this.
Next, set the following:
- The weight for the prior probabilities of MS lesion locations, using the slider:

The default weight is 0.5. Setting a higher value will give more weight to
the prior probabilities. With a setting of 1.0 (which is, of course, not recommended),
the intensities of the images are completely ignored. With a setting of
0.0, the prior distribution of MS lesions is completely ignored. In
practice, you should find that a setting of between 0.25 and 0.5 works
well. You should use the following as guide to selecting the weight:
- If the segmented lesions spread too much into the surrounding grey
matter, then the weight is too low. Set the weight higher.
- If there is clear variability in the extent of the segmented lesions, then
the weight is too high. Typically, some lesions are segmented well, but other
lesions of similar intensity characteristics are not segmented. Set the
weight lower.
You will see below some example images showing the
effect of varying the weight.
 When selected, connections are
considered in three dimensions (in-plane and between slices). When not
selected, only in-plane connections are considered. Use this option when
you want to delineate the lesions across multiple slices, but you do
not want to define seed ROIs in all slices. It may be necessary to turn
this option off when odd-numbered and even-numbered image slices are
slightly out of register, as can happen if a patient moves slightly during
the scan.
When selected, connections are
considered in three dimensions (in-plane and between slices). When not
selected, only in-plane connections are considered. Use this option when
you want to delineate the lesions across multiple slices, but you do
not want to define seed ROIs in all slices. It may be necessary to turn
this option off when odd-numbered and even-numbered image slices are
slightly out of register, as can happen if a patient moves slightly during
the scan.
 The MS Lesion Finder tool
assumes that the image slices are ordered according to radiological
convention (i.e., increasing slice number from inferior to superior for
axial slices, from left to right for sagittal slices, and from anterior to
posterior for coronal slices). If this is not the case, then select this
option to tell the tool to reverse the slice order before analysing.
This option is necessary because part of the analysis pipeline involves
registering the MRI scans to a standard head template image which has
radiological slice ordering.
The MS Lesion Finder tool
assumes that the image slices are ordered according to radiological
convention (i.e., increasing slice number from inferior to superior for
axial slices, from left to right for sagittal slices, and from anterior to
posterior for coronal slices). If this is not the case, then select this
option to tell the tool to reverse the slice order before analysing.
This option is necessary because part of the analysis pipeline involves
registering the MRI scans to a standard head template image which has
radiological slice ordering.
Clicking the  button
will save the setup so that next time the MS Lesion Finder tool is started,
it will have the same setting as in this session.
button
will save the setup so that next time the MS Lesion Finder tool is started,
it will have the same setting as in this session.
The quickest way to define the seeds is to use Marker ROIs. Start the
ROI Toolkit, change the
display layout to display a single slice, and
on each image slice place a Marker ROI on each lesion, as illustrated in
the figure below. To place a Marker ROI, simply point to the location
where you want the Marker and press the 'm' key on your keyboard. See the
notes about keyboard shortcuts if this does
not work for you.
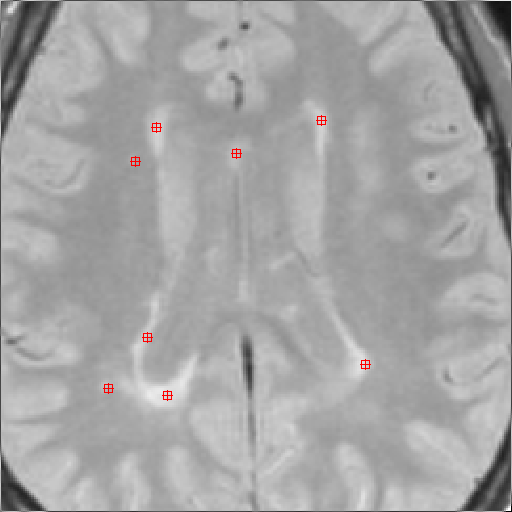
Note: try place the Marker reasonably centrally within each
lesion. If the lesion is large, consists of two or more confluent lesions,
or contains areas that are less distinct, you can place as many markers as
needed to ensure that the whole of the lesion is marked. However,
Markers should not be placed outside the bounds of a lesion.
Note: you must have either one slice displayed, or a
selected slice
in order to be able to place ROIs.
Page through all the slices of the scan, placing Markers on all lesions in
every slice. The more care you take over this task, the more reliable will
be the results.
When you are ready to find the MS lesions, click the
 button.
A series of dialogs will pop up to
show that the MS Lesion finder is working. When the MS Lesion Finder is
finished, it will create a set of ROIs that surround the MS lesions.
These ROIs will either be:
button.
A series of dialogs will pop up to
show that the MS Lesion finder is working. When the MS Lesion Finder is
finished, it will create a set of ROIs that surround the MS lesions.
These ROIs will either be:
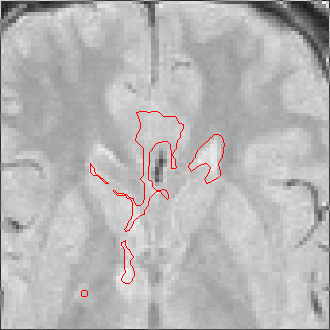
Illustrated below is the result of using both echoes from a
double-echo dataset as input images. The resulting ROIs are shown
superimposed on the first echo image.

MS lesions outlined by the MS Lesion Finder. Both the first and second
echoes of a double echo pulse sequence have been used when propagating
from the seed points.
Note that the smaller or less
distinct lesions have been largely ignored by the finder. Setting a lower
fuzzy threshold will result in larger, more inclusive ROIs.
Notes:
- The intensity hint "Brighter" was provided for the first echo image,
since the lesions are always brighter than the surrounding parenchyma and CSF.
- The intensity hint was set to "Unknown" for the second echo image,
since the lesions are darker than CSF, but brighter than parenchyma in
a T2-weighted image.
- The threshold setting of 0.7 used was derived by trial and error. Since
your image data is likely to have different contrast from that used to
validate the tool, you will need to experiment to find the optimal fuzzy
threshold setting for your data. One the optimal setting has been found,
you should stick to that setting for all analyses where results are to be
compared.
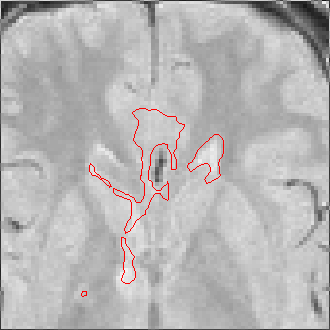
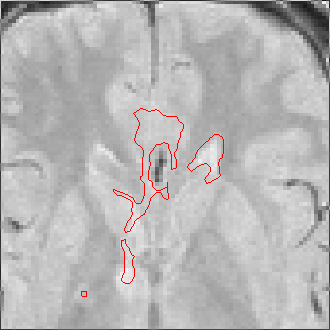
- If you select , connections are made in
3-dimension and it may not be necessary to mark the lesions in every
single slice. In principle, this should make the lesion finding more
reliable and reproducible. In practice, however, slight misregistration
between slices because of patient motion during the scan can give
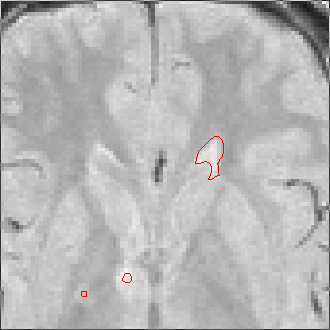
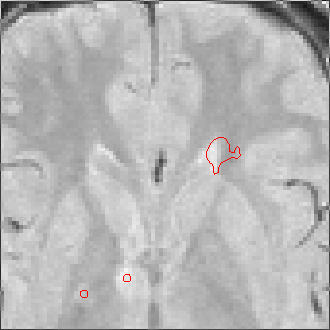
problems. The figure below shows the result when placing Marker seeds in
just one slice (the slice in the centre), but connecting in 3-D. The
lesions have been propagated to other slices by through-slice connections.
MS lesion propagation in 3-D.
The resulting ROIs can be edited or deleted,
or new ROIs added as you wish. You can then use the ROI
totaliser to compute the final lesion volume.
Note: the Markers that you used as seed points are just
points on the image having no area, and therefore they do not contribute
to the total lesion volume.
You should save the Markers
and resulting ROIs to disk as a permament record of the procedure.
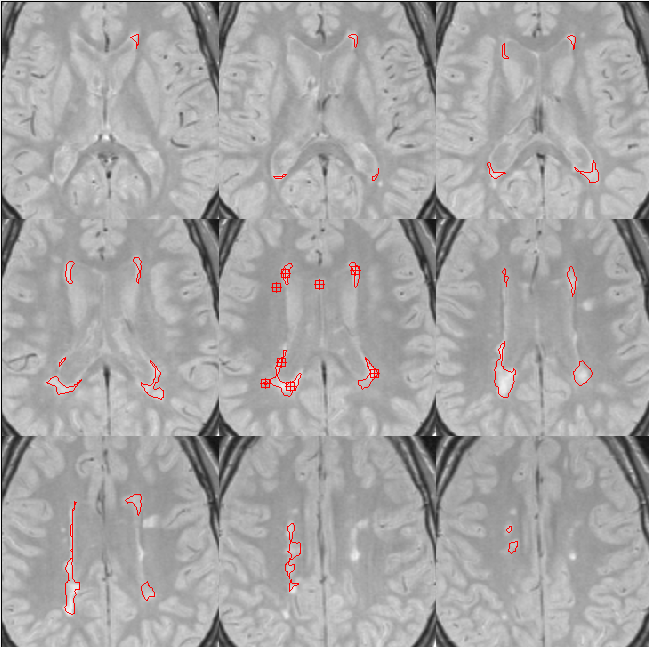
Varying the Weight on the Prior Probabilities
As noted above, setting a non-zero weight on the prior probabilities using the
slider helps to control unwanted spread of the ROIs, particularly into the
adjacent gray matter.
The sequence of segmentations obtained below was obtained with steadily
increasing weight on the prior probability. With a low weight (less than 0.3),
the seeds have propagated into the grey matter adjoining the lesions. However,
as the weight is increased above 0.5, it becomes more and more apparent that
the shape of resulting ROI does not match the perceived border of the
lesion. At a high weight, the ROI takes on the shape of typical lesions in the
template probability image, rather than the shape of the lesion in this
patient scan.
In general, we would recommend you use a weight of between 0.25 and 0.5 as a
starting point when determining the optimal settings for your data-set.
 |
 |
 |
Marker seeds |
Weight=0.0 Threshold=0.55 |
Weight=0.1 Threshold=0.50 |
 |
 |
 |
Weight=0.2 Threshold=0.45 |
Weight=0.3 Threshold=0.41 |
Weight=0.4 Threshold=0.40 |
 |
 |
 |
Weight=0.5 Threshold=0.38 |
Weight=0.7 Threshold=0.25 |
Weight=0.9 Threshold=0.15 |
 . If you are not happy with the
MS Lesion Finder's result, you can simply select Undo from the
ROI Toolkit's Edit menu (or type CONTROL-Z to undo the addition of
the resulting ROIs), change the MS Lesion Finder's settings, and try again.
. If you are not happy with the
MS Lesion Finder's result, you can simply select Undo from the
ROI Toolkit's Edit menu (or type CONTROL-Z to undo the addition of
the resulting ROIs), change the MS Lesion Finder's settings, and try again.
 . A
. A