Perfusion and DCE-MRI Analysis - Introduction
For perfusion and dynamic contrast-enhanced MRI (DCE-MRI), contrast agents are used
in MRI or CT scans, where the passage of the contrast agent is monitored
by repeatedly acquiring the scans. These can be either
T1-weighted or T2*-weighted MRI scans, or x-ray CT scans.
- T1-weighted images are typically used in dynamic
contrast-enhanced MRI (DCE-MRI) to monitor the concentration of contrast
agent as it leaks from the vasculature into the extra-cellular
interstitial space of the tissue.
- T2*-weighted MR images, or dynamic CT scans are typically used
in brain perfusion studies to monitor the concentration of contrast
agent in the vasculature as it passes through the brain tissue.
The two tools used to analyse these different sorts of scan have a
great many similarities, and are described together in this
Chapter. For both tools, the concentration of contrast agent is
assumed to be proportional to the change in relaxation rate in the
tissue (for MRI) or the change in density (for CT). Analysis is normally performed pixel-by-pixel,
but the DCE-MRI tool can also analyse dynamic parameters within a region
of interest.
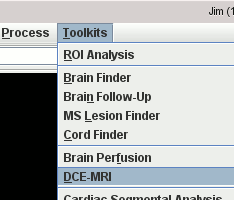
Start the Brain Perfusion tool
or DCE-MRI tool from the
Toolkits menu.


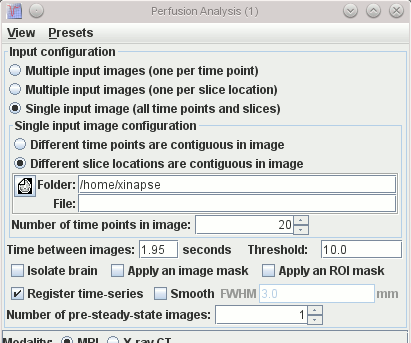
Some of the setup is common to both tools. The setup for organising and
pre-processing the input images, and setting up the output images is
common, and these are described below.
Input Images

-
The images that are to be analysed consist of a time-series of
images, which may be from a single slice location or multiple
slice locations. These may be organised in one of three ways, and
you must tell the analysis tool in which way they are organised.
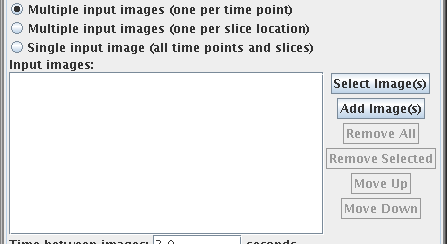
If you selected either of the first two options (multiple input
images), then the window changes appearance to that below.

The panel below the "Input images:" label shows the current list
of selected input images. You use the:
 button to
select a new set of images and put them to this list.
 button to
select a some more images and add them to this list.
 button to
remove all the images from the list.
 button to
remove the selected the image(s) from the list (you must first click
image(s) in the list to select them).
 and
and  buttons to
move the selected image(s) up or down the list. Images must be in the
correct order for analysis - either in the correct slice order, or
in the correct time order. Use these buttons to reorder them if
they are not.
- The time between subsequent images in the acquisition (in
seconds).
- Threshold. This is a way to prevent processing of pixels in
the background noise. To do this, enter an intensity value. If the
pixel intensities at each location for all time points are below the
threshold you set, then the intensity in the resulting output
images at that location is set to zero.
- The standard output image masking options using the
Brain Finder, a mask image, or ROI mask.
- Whether you want to perform an image registration as a pre-processing step. If you select
this option, a rigid-body registration will attempt to correct for patient motion between the
different time points. This is quite time-consuming, so you may want to perform the analysis
without registration first to check that your setup is correct. If you select this option, a new
set of images will be created on disk with the same name(s) as the input images(s), but prefixed
by the letter "r". These images are the registered images, and can later be used to check the
quality of the registration (for example, by playing in a
movie loop). You can also use them as input images if you
want to repeat the perfusion or DCE-MRI without going through the registration process again.
Note: this in-line registration procedure only corrects for in-plane rotations and
translation. If the subject motion is more complicated, with out-of-plane translation and
rotations, you should pre-process the images using the Time-Series Registration tool. Then
you will have more control over the degrees-of-freedom for motion correction.
- Whether you want to spatially filter the images as a
pre-processing step. If you select this option, a 2-D Gaussian blur
will be applied to your input images before calculation of dynamic
parameters. This effectively reduces the spatial resolution, but
can improve results where signal-to-noise ratio is poor. If you select this option, please also
set the strength of the blur by setting the full-width at half-maximum (FWHM).
- The number of steady-state images. Some pulse sequences need
a few scans to be acquired in a dynamic series before a steady
state of magnetisation is reached. If this is the case, the tool can discard the
first few time points by entering an integer number of time points
to discard.
Image Output

Both the brain perfusion and DCE-MRI analysis tools produce several
parametric output images. The name of the output parameter is
appended to a "base" image name. You choose the base output image
name by clicking on the  icon,
or by typing in the directory and file name.
Note: these tools may overwrite existing output images, depending on the type of output
image, and the setting of the overwrite preference.
Saving Settings
If you want to perform several similar analyses, you can set up
the tool to your requirements, then press the  button. Then, next time you start the
tool, it will be configured in the same way. To revert to the
default settings, press the
  button.
Alternatively, if you have several different analysis setups
that you want to work with, you can save the whole setup as a "preset". Select
"Save as Preset ..." from the "Presets" menu. Then, when prompted, enter a title
for the preset - this will be the name given to the preset when it is put into the
Presets menu. At any future time, you can then recall the whole setup by selecting the
preset title from the Presets menu.
You can delete presets by selecting
"Manage Presets ..." from the "Presets" menu.
Having set up your input and output images, you can go on to perform either
the brain perfusion or DCE-MRI analysis.


 and using the file chooser to select the input
image, or by pressing the right mouse
button and selecting from the menu of recently-used images.

 button to
select a new set of images and put them to this list.
 button to
select a some more images and add them to this list.
 button to
remove all the images from the list.
 button to
remove the selected the image(s) from the list (you must first click
image(s) in the list to select them).
 and
and  buttons to
move the selected image(s) up or down the list. Images must be in the
correct order for analysis - either in the correct slice order, or
in the correct time order. Use these buttons to reorder them if
they are not.

 icon,
or by typing in the directory and file name.
 button. Then, next time you start the
tool, it will be configured in the same way. To revert to the
default settings, press the
  button.