ROI Propagation - Volume Flow Rate (VFR)
This second calculation allows the amount of (typically) blood flowing through vessels to
be calculated from a phase-contrast angiography image.
In this example, we will use a single axial slice phase-contrast angiogram through the
neck to calculate the volume flow rate (VFR) in a carotid artery and a jugular vein.
An MRI phase-contrast angiography sequence results in both a magnitude image and a phase image;
the phase image is used to calculate the blood flow velocities, but we will use the magnitude
image to outline the artery and vein.
The phase image is shown as a
movie below.
Phase images have intensity ranges that map to phase changes of +π .. -π. The actual
intensity values that map to this phase range can be -4096 .. +4096 (typical of images from
Siemens MRI scanners), 0 .. +4096 or -3142 .. +3142 (typical of Philips images).
Jim can automatically convert from the image intensity values to phase values.
We will outline the artery and vein on a few of the magnitude cine frames,
propagate the ROIs to all time points and then go on to calculate the VFR.
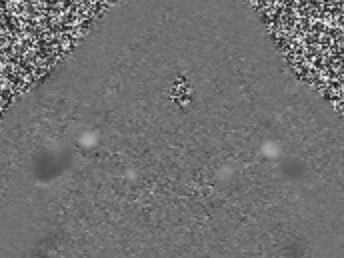
Having loaded the magnitude image into Jim's main display, we launched the ROI Propagation
toolkit and, using Spline ROIs,
outlined one of the carotid arteries and one of the jugular veins at 3 time points: at the
beginning and end of the cardiac cycle, and one point around systole. One of these time points is
illustrated below:
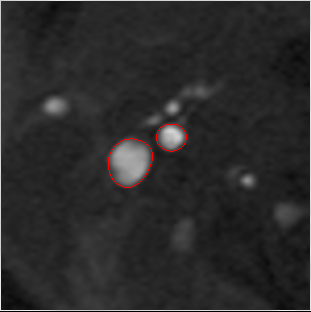
Phase-contrast angiogram magnitude image, with carotid artery and
jugular vein outlines shown at one of the time-points
For ROI propagation across all time points, we used the settings:
- Number of shape coefficients = 6. The vessels have a fairly simple outline shape, and 6 shape
coefficients is enough to capture the variations in shape.
- Changes are periodic with time. This is an E.C.G. triggered cine sequence, where the last
image frame joins back to the first at the end/start of the cardiac cycle.
- The number of time coefficients was not set manually.
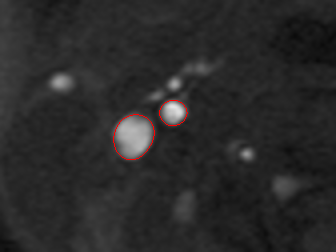
This resulted in good outlining of the artery and vein at all time points, as shown in the
movie below.
Calculating the VFR
We will now go on to calculate the VFR of the vessels. Select the 'VFR' tab
in the 'Propagated ROI Calculations' panel:
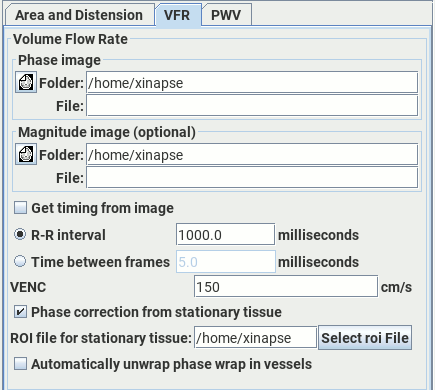
Then set:
- The phase image in the image "Phase image" selection panel.
- (Optional) The magnitude image in the "Magnitude image" selection panel. You do not
normally have to select the magnitude image here. However, if you work with images from a
General Electric MRI scanner, then you will need to select the magnitude image; this is needed
in most cases to correctly convert from phase image pixel values to flow velocity.
- Either the R-R interval, or the time between individual frames of the angiogram
image. If you want Jim to get the time between individual frames from the phase image,
then select the
 check-box.
If Jim
cannot find the time between frames from the image, then it will give an error, and direct you
to set the value manually.
check-box.
If Jim
cannot find the time between frames from the image, then it will give an error, and direct you
to set the value manually.
- The velocity encoding factor (VENC) for the angiogram. The VENC is the maximum flow
velocity that can be encoded without phase wrap.
- Phase correction using a region of stationary tissue. Due to machine imperfections, there
may be a constant phase offset in all tissues. If you want to correct this, the phase offset
can be measured in stationary tissue, where the intensity in the phase image should correspond
to zero phase. Place one or more
ROIs on a region of stationary tissue, and
save the ROIs into a separate ROI file.
Select the
 check-box, then select that ROI file below.
 . Select this if the phase image suffers from phase wrap
and you want Jim to try to correct this automatically. Phase wrap happens when
the flow velocity is outside the expected range, and consequently the phase values
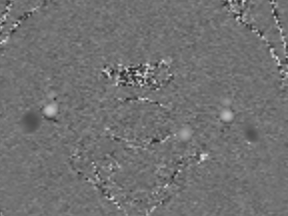
stray outside the range -π .. +π. The movie image below shows a carotid artery
with phase wrap in the carotid arteries.
. Select this if the phase image suffers from phase wrap
and you want Jim to try to correct this automatically. Phase wrap happens when
the flow velocity is outside the expected range, and consequently the phase values
stray outside the range -π .. +π. The movie image below shows a carotid artery
with phase wrap in the carotid arteries.
If you want to identify the regions of interest, you can do this by providing ROI
annotation to the ROIs at any of the time time points. If you
provide annotation at multiple time points, the annotation chosen with be that found at the first
annotated time point. In the example below we have used the annotation "Jugular" and "Carotid" to
identify the two vessels.
Click the
 button to start the
VFR calculation.
button to start the
VFR calculation.
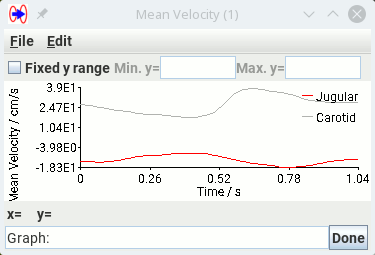
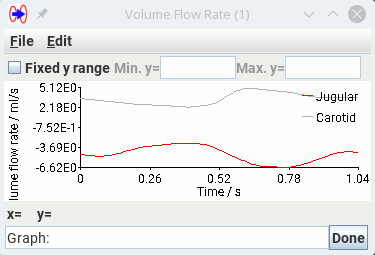
Two graphs showing the average flow velocities and the volume flow rates through each ROI then pop
up:
Then a dialog pops up with a report on the calculated volume flow rate:
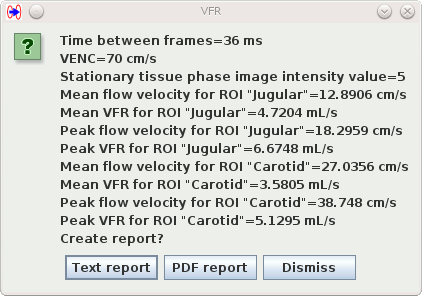
The dialog shows:
- The mean and peak flow velocity for each of the ROIs. Note that these velocities
are averaged of the whole ROI.
- The mean and peak volume flow rate (VFR) for each of the ROIs.
You can save these data to a report, either in plain text format, or in PDF format by clicking the
appropriate button.