DICOM Storage Server
The DICOM Storage Server allows remote DICOM nodes to send images
for storage by Jim on a local hard disk,
if they support Storage as a service class user (SCU).
Jim's storage server is promiscuous: it will accept storage
requests from any remote DICOM node, with any Application Entity
title, and should not therefore be used on non-secure networks
unless you wish it to act in this way.
If you have problems with DICOM Storage Server and have checked
the configuration of both Jim and the remote DICOM node,
then please see the DICOM
debugging section which will help pinpoint the problem. You
can also download our DICOM conformance
statement which may help in the setting up of your remote
DICOM nodes to communicate with Jim.
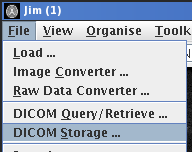
Start the Storage Server from the File menu: 
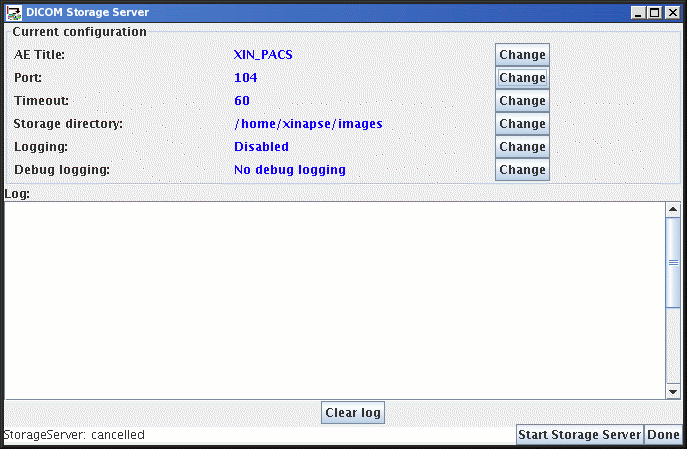
This brings up the Storage Server window:

Before you use it for the first time, you will need to
configure the Storage Server. For subsequent sessions, these
settings will be configured automatically.
- Application Entity (AE) title. The default is "XIN_PACS", but
you can set it to what you wish by clicking the
 button next to the current
title (which is shown in blue).
- The port number. The default port number used by StorageServer
to listen for requests is 4560. Port 104 is the standard
port for DICOM communications, and may want to use this unless the
supplier of your remote DICOM node tells you otherwise. Note,
however, that you may need Administrator access (root permission)
to use port 104. If this is the case you can either:
- Speak to your system administrator who may be able to give you
permission to use port 104.
- Use a different port. Port numbers of 1024 or above do not
usually need Administrator (root) permissions to use - hence the
choice of the default port number (4560) for StorageServer.
- Start the storage server at bootup, where root permissions
will allow the use of port 104, using the Storage Server in stand-alone mode.
- Timeout. This is the time allowed before inactive connections are
dropped. The default is 60 seconds, which is usually adequate,
but you may wish to increase this is your remote DICOM node is
exceptionally busy.
- Storage directory. Clicking on the
 button will pop up a file chooser allowing you to select a
new directory in which DICOM images are to be stored. Jim will create
sub-directories within this root directory as it needs, so ensure
that you have write permission for this directory.
- Logging. Disabled by default. If enabled, a log of storage
activities appears in the scrollable window below the
configuration parameters.
N.B. the AE Title and port number must be part of the
configuration of the remote node that wants to send images to
Jim's storage server. The remote node will also need to
know the I/P address of the computer that is running Jim.
When the configuration is correct, press the  button. Jim is now ready to
accept incoming images, and store them to disk in the location you
set.
Images are stored in a directory structure with a hierarchy as
follows:
- A first level directory is created for each modality. For example a sub-directory
called "MR" is created for MR images; a sub-directory
called "CT" is created for CT images etc.
- A second level directory is created for each patient, with a
name derived from the patient name and ID.
- A third level directory is created for each study for the patient, with a
name derived from the study number.
- A third level directory is created for each series in the study, with a
name derived from the series number.
Each series-level directory will contain all the individual image
instances for the series which is stored.
If you have logging enabled, you clear the scrolling log at any
time by pressing the  button. However, to change any of the configuration parameters
above, you will need to stop the Storage Server.
If the Storage Server start OK, but does not appear to be
accepting images from remote DICOM nodes, then you can enable
debug logging, but pressing the  button next to the Debug
logging configuration. This brings up a dialog to enable debugging
of the Storage Server.
To stop accepting images for storage, press the  button. If you press the
  button, the Storage Server will have to be stopped
before you can finish with this tool.


 button next to the current
title (which is shown in blue).
 button will pop up a file chooser allowing you to select a
new directory in which DICOM images are to be stored. Jim will create
sub-directories within this root directory as it needs, so ensure
that you have write permission for this directory.
 button. Jim is now ready to
accept incoming images, and store them to disk in the location you
set.
 button. However, to change any of the configuration parameters
above, you will need to stop the Storage Server.
 button next to the Debug
logging configuration. This brings up a dialog to enable debugging
of the Storage Server.
 button. If you press the
  button, the Storage Server will have to be stopped
before you can finish with this tool.