Correcting Warps in Diffusion-Weighted Echo-Planar Images
Most diffusion-weighted images are acquired using the echo-planar imaging
(EPI) pulse sequence, and because of this they are prone to distortions caused
by the application of the diffusion-weighting gradient pulses. These
distortions can be severe, particularly on older MRI scanners, and lead to
errors in calculation of the tensor. The diffusion analysis toolkit provides a
pre-processing step for the correction of these distortions, prior to tensor
calculation.
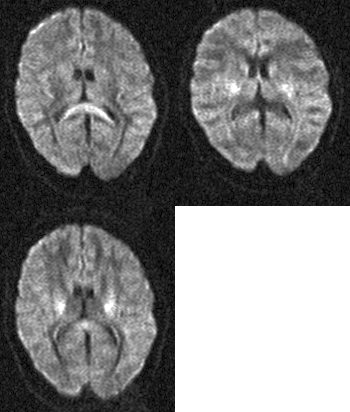
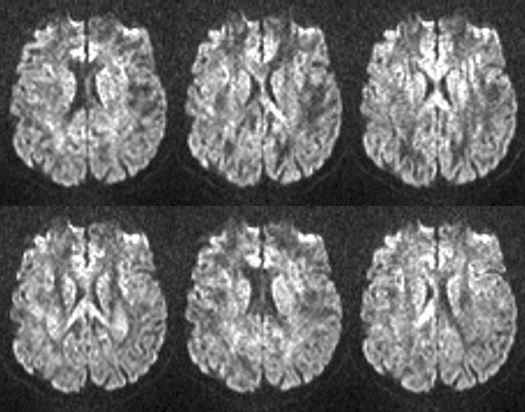
Below, you can see two images. The image on the left is from an
older-generation MRI scanner; you can see a slice with
different diffusion weightings with severe distortion of the image when
diffusion weighting is applied in different directions. On the right is an
image from a more modern scanner using a double-refocused EPI sequence with
minimal distortion that probably does not need eddy-current warping
correction.
Example images showing eddy-current distortion in EPI images.
 |
 |
| Warp correction needed |
Warp correction
probably not needed |
To perform warp correction as a pre-processing step prior to tensor
calculation, ensure that the
 check-box is selected. The warp correction panel will then be visible:

You can change various setting that will alter the speed of warp correction,
and the degree of success and quality of the correction.
- Phase-encoded direction. You must tell Jim which this the
phase-encoded direction in the image, either:
- Vertical if the phase-encoded direction is in the image top-to-bottom
as you see it in the screen.
- Horizontal if the phase-encoded direction is in the image left-to-right
as you see it in the screen.
Without the correct setting for the phase-encoded direction, warp correction
will fail.
- Variation with slice position. The warp correction algorithm
builds up a model for the way that in-slice distortions vary with slice
position. The more detailed the model, the longer it will take to perform
warp correction, but the more likely it is that the correction will produce
an acceptable result. You can choose:
- Uniform. The distortions found are not allowed to vary with
slice position. Choose for fastest correction.
- Linear. The distortions found are allowed to vary linearly
with slice position.
- Quadratic. The distortions found are allowed to vary quadratically
with slice position. Choose if you find that warp correction fails to make
a good correction in the top and bottom slices of your images.
- Warp correction threshold. Set an intensity threshold. Pixel with intensity
values below the threshold are masked out of the images, and not used in the
the assessment of image alignment in the warp correction. Setting a non-zero
value may allow you to remove the influence of the background noise.
- Correct subject motion. Select this option if there is subject motion as well as
gradient-induced warping. Patient motion is included into the model of distortions as a
rigid-body translation/rotation.
- Max. iter. The maximum number of iterations of the warp correction
algorithm allowed before it has been deemed to fail. One iteration cycle can
take a long time, and normally 100 iterations should be sufficient.
- Sub-sampling factor. Warp correction is a lengthy process, but
fortunately Jim's algorithms are extremely robust because they use an implicit
model of the eddy
current behaviour. Because of the large numbers of pixels in
diffusion-weighted images, estimating the distortions is a vastly
over-determined problem, and this can be exploited to speed up
processing. You can randomly sub-sample the DW images and use just a subset
of pixels to perform the correction. Do this by setting the sub-sampling
factor:
 . A factor of
1 leads to no sub-sampling, while a factor of 100 (the maximum) uses only one
in every one hundred pixels when evaluating the degree of distortion.
Use low sub-sampling factors if distortion correction does not work robustly,
and only experiment with larger factors if it is working well. In practice
values below 10 are most likely to result in good correction, and give a
worthwhile reduction in processing time.
With the  check-box selected, when you go on to calculate the
diffusion tensor, the warp correction will be automatically performed.
Warp correction produced a new set images, which are like the set of input images that you use, but their name will have
a prefix "wc", and which have been warp-corrected. If the warp correction finds
that a set of images exists on disk which have already been warp corrected
(having the file name prefix "wc"), you will see this pop-up:

Select:
- Do it again if you want to redo the warp correction, overwriting
the existing warp-corrected images. You will probably want to do this if the
warp correction performed badly before and you want to try some different
parameter settings.
- Use the existing warp-corrected images to skip the warp
correction and use those images that have already been corrected.
- Cancel to cancel warp correction and tensor calculation.


 check-box is selected. The warp correction panel will then be visible:

 . A factor of
1 leads to no sub-sampling, while a factor of 100 (the maximum) uses only one
in every one hundred pixels when evaluating the degree of distortion.
Use low sub-sampling factors if distortion correction does not work robustly,
and only experiment with larger factors if it is working well. In practice
values below 10 are most likely to result in good correction, and give a
worthwhile reduction in processing time.
 check-box selected, when you go on to calculate the
diffusion tensor, the warp correction will be automatically performed.
Warp correction produced a new set images, which are like the set of input images that you use, but their name will have
a prefix "wc", and which have been warp-corrected. If the warp correction finds
that a set of images exists on disk which have already been warp corrected
(having the file name prefix "wc"), you will see this pop-up:
