Saving a MIP to a New Image
You can save a MIP to a new image (e.g., a NIFTI or a DICOM image) from
the File menu

This will create a new single-slice image on disk, showing the current
MIP view. A File Chooser will pop up, for you to set the file name for
the saved MIP image.
Export a MIP as a Movie
You can export a MIP movie showing the rotation, from
the File menu

This brings up a dialog to setup the movie:
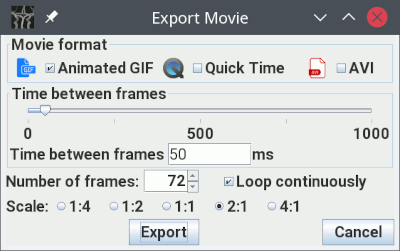
First, choose what format you want for the exported movie:
 Animated GIF image.
 Quick time movie
 Audio Video Interleave (AVI) file
Select the settings you want for the exported movie:
- Time between successive frames of the movie, in milliseconds.
- The number of movie frames. In the movie, the MIP will rotate 360
degrees, so for example if you select 10 frames, the rotation step
between frames will be 36°.
- Whether to loop continuously - applicable to animated GIF images only.
If not selected, the animation
will run just once through, and then stop at the last frame. With other
formats, the looping behaviour is controlled by the media player.
- Scale. The movie will be exported so that one image pixel
corresponds to one screen pixel in the movie. If you want to
scale the image up or down to make its on-screen appearance bigger
or smaller, select an appropriate scaling by clicking on one of
the buttons.
When the export is set up, click on the
 button. You will then be
prompted to select a file into which the exported movie will
be written. The animated GIF file below, showing an MRI time-of-flight angiogram,
was created using the export feature.
button. You will then be
prompted to select a file into which the exported movie will
be written. The animated GIF file below, showing an MRI time-of-flight angiogram,
was created using the export feature.
