DICOM Query/Retrieve
Jim provides facilities to connect to your DICOM servers
if they support Query/Retrieve as a service class provider
(SCP). Jim can query a remote DICOM node and list the
patients according to a simple search query. It can then retrieve
the images and either:
- Display the retrieved image, or
- Store the retrieved images on disk in DICOM format. These can
then be converted or imported and displayed using Jim.
If you have problems with DICOM Query/Retrieve and have checked
the configuration of both Jim and the remote DICOM node,
then enable debugging by selecting Debugging Options ...
from the Configure menu. Please see the DICOM
debugging section which will help pinpoint the problem. You
can also download our DICOM conformance
statement which may help in the setting up of your remote
DICOM nodes to communicate with Jim.
Start Query/Retrieve from the File menu: 
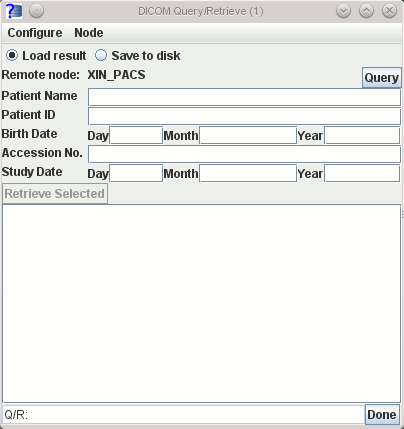
This brings up the Query/Retrieve window:

Before you use it for the first time, you need to configure
Query/Retrieve so that it knows about the remote DICOM server(s)
that you want to query. Click here for instructions.
To tell Query/Retrieve how to handle images acquired sequentially with the
same pulse sequence, select Preferences ...
from the
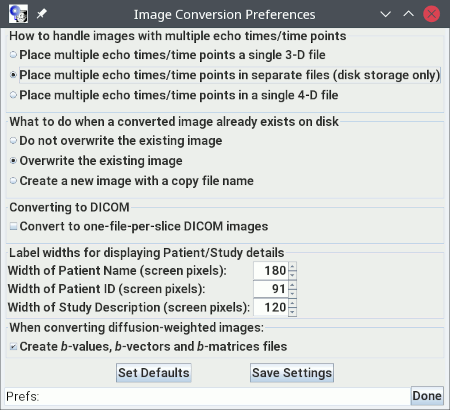
Configure menu. This pops up the preferences dialog :

This allows you to choose:
- How scans are handled when the same scan is
acquired multiple times to create a time-series of images. As an example,
this type of scanning is done for DCE-MRI or
fMRI.
The different time points can be split across multiple image files, or
merged into a single image file (either a 3-D or a 4-D images).
- What Query/Retrieve should do when a retrieved image already exists on disk in the chosen
image
storage folder.
- If you select "Do not overwrite the existing image", an error message will be shown and
the existing image will not be overwritten.
- If you select "Overwrite the existing image", the existing image will be overwritten
without any warning messages.
- If you select "Create a new image with a copy file name", a new image will be created
with a modified file name, appended with a suffix "_aa" .. "_zz".
-
The widths of the labels in the Query/Retrieve dialog when displaying the Patient
Name, Patient ID and Study Description.
-
Whether to save text files containing the b-values, gradient vectors and
b-matrices when converting diffusion-weighted images and saving them to
disk. The coordinate system for gradients vectors and and b-matrices is the
image row/column/slice directions. These text files may be useful when running
external diffusion processing packages.
Click the  button
to save the settings so that they will be retained next time you start
Jim.
Then:
You can now:
- Double click on an individual series. Depending on the setting
of
 this will either:
- Load the image into Jim, or
- Store the DICOM images for that series to disk, in the
location you selected for the Image Storage Directory.
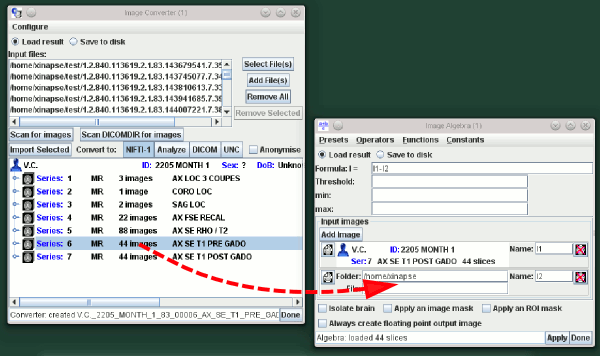
- Drag and drop an individual series onto any Image Selection panel.
You can also drag and drop an image series from the Query/Retrieve onto
any Image Selection panel. So, you can drop the image series onto the
the image selection box in Jim's display, or into one of the image selection
boxes in any of Jim's tools, just as you can with the Image Converter.

Dragging and dropping and image series with the mouse into
the Algebra Tool's input image selection panel.
- If you have selected "Save to disk", the
 button becomes active. Then you can
select one or more series (or indeed the whole patient) using the
mouse and retrieve the whole of your selection by pressing the
  button.
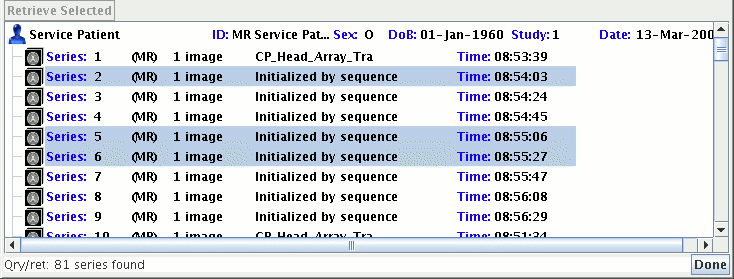
Note: You can select more than one patient or series by
pressing the SHIFT and CONTROL keys on your keyboard as you click
on the patient or series. The selection in the illustration above
would retrieve the whole of the patient "Service Patient", whereas
the selection in the illustration below would retrieve just series
2, 5 and 6.
If you chose to store images to disk, all images are stored in the current
storage directory in DICOM format. To change the destination directory, click Image
Storage Directory ... in the Configure menu. The image storage directory
is remembered between different sessions of using Jim. Images are stored in a
directory structure with a hierarchy as follows:
- A first level directory is created for each modality. For example a sub-directory
called "MR" is created for MR images; a sub-directory
called "CT" is created for CT images etc.
- A second level directory is created for each patient, with a
name derived from the patient name and ID.
- A third level directory is created for each study for the patient, with a
name derived from the study number.
- A fourth level directory is created for each series in the study, with a
name derived from the series number.
Each series-level directory will contain all the individual image
instances for the series which is stored.

At any point you can enter a new Query and press the
 button to generate a
new list of Patient/Studies.
Note: if you cancel a query that is in progress, it will
take a few seconds to communicate this cancellation to the remote node. During
this time, it will not be possible to initiate a new query or
retrieve.
Note: while Jim is capable of retrieving all kinds of
DICOM images, it may not be able to display all of them. For
example, Jim cannot display spectra, and some types of
image with overlays. In this case, if you have "Load result"
selected, Jim will give an error message that indicates that the
image retrieved could not be displayed.
The Logging and
Preferences options set
from the Configure menu are the same as for the
Image Converter tool.
Debugging DICOM Query-Retrieve Problems
If query/retrieve fails, or the retrieved image fails to appear in
Jim's display, you can sometimes get to the root of the problem by
turning on debugging messages. If you would like Xinapse Systems to help
get to the root of these problems, then we may request you send us these
debugging messages.
Please see the DICOM
debugging.


 button
to save the settings so that they will be retained next time you start
Jim.

 checkbox
from the Configure menu. This then allows you to search on the following additional
items:
 button.


 this will either:
 button to generate a
new list of Patient/Studies.