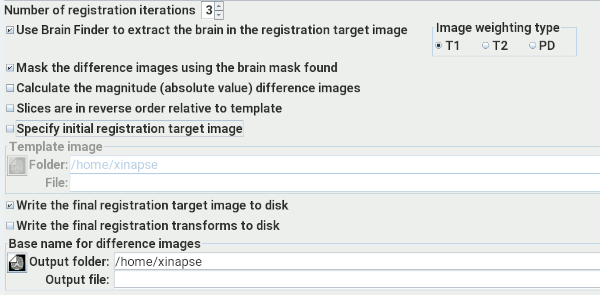
Having set up the Brain Follow-Up tool's input images as detailed in the Introduction, you can now set up the other processing options:
 .
Only available when there are more than two time-points.
Set the number of iterations to be performed, between 1 and 3. This affects the type of
processing performed and the time required to do it.
.
Only available when there are more than two time-points.
Set the number of iterations to be performed, between 1 and 3. This affects the type of
processing performed and the time required to do it.
 .
Select this option if you
want to use Brain Finder to isolate the brain as part of
the analysis. This can help in two ways:
.
Select this option if you
want to use Brain Finder to isolate the brain as part of
the analysis. This can help in two ways:
 .
Select this option if you want to use the brain mask (found in the step above) to mask the
brain in the output difference images. This option is only available if you chose to use the
Brain Finder with the option above.
.
Select this option if you want to use the brain mask (found in the step above) to mask the
brain in the output difference images. This option is only available if you chose to use the
Brain Finder with the option above. .
Select this option if you want the Brain Follow-Up tool to calculate the magnitude (absolute
value) of the output difference images, rather than the signed difference. This can be
useful if you are expecting to see, and assess, both negative and positive difference, because
when displaying the signed difference, negative differences can often be missed (because they
are displayed darker than the background).
.
Select this option if you want the Brain Follow-Up tool to calculate the magnitude (absolute
value) of the output difference images, rather than the signed difference. This can be
useful if you are expecting to see, and assess, both negative and positive difference, because
when displaying the signed difference, negative differences can often be missed (because they
are displayed darker than the background). .
Only available when there are more than two time-points.
Select this option to tell the Brain Follow-Up tool that your image slices are in reverse
order compared to the template image. Jim's built-in head template image has slices
that are in inferior-to-superior order with increasing slice number. If your image
slices are in superior-to-inferior order, then select this option, which will reverse the
order in the template.
.
Only available when there are more than two time-points.
Select this option to tell the Brain Follow-Up tool that your image slices are in reverse
order compared to the template image. Jim's built-in head template image has slices
that are in inferior-to-superior order with increasing slice number. If your image
slices are in superior-to-inferior order, then select this option, which will reverse the
order in the template. .
Only available when there are more than two time-points.
Jim has a built-in registration target (template) image used in the first stage of
registration. If this does not work well, and you want to try using your own registration
target image, then select this option and select that target image using the image selection
panel below.
.
Only available when there are more than two time-points.
Jim has a built-in registration target (template) image used in the first stage of
registration. If this does not work well, and you want to try using your own registration
target image, then select this option and select that target image using the image selection
panel below. .
If you select this option, Jim will write the final registration target, used in the
final registration iteration to a disk image. The name will be created from the base image
name you set with the suffix "Template". This can be useful if you want to verify that the
final target image is sensible.
.
If you select this option, Jim will write the final registration target, used in the
final registration iteration to a disk image. The name will be created from the base image
name you set with the suffix "Template". This can be useful if you want to verify that the
final target image is sensible. .
If you select this option, Jim will write the final registration transforms found.
These can later be used by the Image Registration
tool and applied to other images, if you want to transform them in the same way.
.
If you select this option, Jim will write the final registration transforms found.
These can later be used by the Image Registration
tool and applied to other images, if you want to transform them in the same way.
 button will start the analysis.